Thursday, 6 December 2012
Sound Problem in Windows
There can be a number of reasons if your computer doesn't play any sound at all Sound include Windows basic sounds, music etc.
I hope this post script can help you to identify and fix common sound problem in Windows, including no sound coming from your speaker
or headphone.
One of the most common issues experienced in computers is "no sound" problem. The issue can be due to incorrect volume settings, cable connections not connected properly or corrupted audio drivers, sound settings, missing update and may be a problem with your sound card. For the best result just follow three steps below
Step 1. Check Hardware
Step 2. Test with different Audio Applications
Step 3. Use a Troubleshooter
Step 4. Update Driwers or Download New Drivers
Step 1: Check hardware
In our experiences, many sound problem are caused by hardware that's not set up properly,
Many sound problems are caused by hardware that isn't set up properly. What would you should do, just follows the steps below:
1.1. Check The Cable
Check the cable and make sure that the cables are connected properly Speakers and headphones If you're using external speakers, make sure that they are correctly connected to the computer. Many computers have three or more jacks that connect to a sound card or sound processor, including a microphone jack, line-in jack, and line-out jack. Your speakers should be plugged in to the line-out jack. If you're not sure which jack this is, try plugging your speakers in to each of the jacks to see if any of them produce sound.
If you're using headphones, make sure they aren't plugged into the line out (headphone) jack of your sound card or computer (unless you want to be listening with headphones rather than speakers). When you plug in headphones, most computers automatically cut the sound to the speakers.
USB audio devices
If you’re using a USB audio device and also have an internal audio device installed, try these basic troubleshooting steps: Unplug the USB audio device and restart your audio program. Test for sound using the internal audio device. If you hear sound, there might be problems with the USB audio driver or with Windows not using the USB audio device as the default audio device. Close all audio programs, unplug the USB audio device, wait for the USB driver to be uninstalled (this should happen fairly quickly), plug the USB audio device back in to the USB port, wait for the driver to load, and then start the audio program and check for sound. Check that you have the correct audio device set as the default in Windows and in the program. Check the audio device manufacturer’s website for updated drivers.
1.2. Check your sound card
Check to make sure your computer has a sound card, or sound processor, and it's working properly. Open Device Manager by clicking Start, pointing to Control Panel, clicking System, clicking the Hardware tab, and then, clicking Device Manager. Double-click Sound, video and game controllers to expand that category. If a sound card is listed, you have one installed. If no sound card is listed, check the information that came with your computer to see if there's supposed to be a sound card installed. If there should be a sound card installed, you'll need to install one according to the manufacturer's instructions.
1.3. Check power and volume
If you have speakers, make sure they're plugged into a working power source and turned on. Make sure that your speaker volume or headphone volume isn't muted or turned down too low. This is particularly important for laptops, which often have small speakers that can be hard to hear.
Click Start, point to Control panel, and then click Sounds and Audio Devices. Under Device volume, move the slider to the right to increase the volume. Make sure the Mute checkbox isn't selected.
Click Speaker Volume, and make sure the sliders aren't set to Low.
1.4, Audio Icon Missing
If your audio icon is missing from the task bar
Click on Start menu and select Control Panel
If you are Classic View, double click on “Sounds and Audio devices” and select the checkbox beside
Place Volume icon in the taskbar and click on OK.
Step 2. Test With Different Audio Application
It would be better if you could test with different audio application such as Real Player or VLC Player
Step 3: Use a troubleshooter
A troubleshooter is an automated tool that can find and automatically fix some problems with your PC.
The audio troubleshooter can diagnose and fix common sound playback and hardware problems.
Click the link below
audio troubleshooter
Step 4: Update Drivers or Download New Drivers
For Windows to recognize your sound card or sound processor, you need a compatible driver. Most sound cards and sound processors require driver software to work properly. Outdated, incompatible, or damaged sound card drivers can disrupt communication between the computer and the sound card. If you recently upgraded from one version of Windows to another, it's possible that the current sound card driver was designed for the previous version of Windows. If you've had recent power outages, viruses, or other computer problems, it's possible that the drivers have become damaged. Downloading and installing the latest sound card driver for your sound card can help resolve these types of problems.
Here are two ways to find and install a driver:
- Use Windows Update.
You might need to set Windows Update to automatically download and install recommended updates. Installing any important, recommended, and optional updates can update system features and other software that might help fix your sound problems.
Automatically Update Drivers using Windows Update
1. Open Automatic Update by clicking Start, pointing to Control Panel and clicking Automatic Update.
2. Click Automatic and select the day and time to download update
3. Click Apply
- Install Software
It may come with a disc or download direct on websites
To download and install a driver yourself
If Windows can't find a driver for your sound card or sound processor, and the device didn't come with driver software, you can look for a driver on the manufacturer's website. Driver updates are often available in the support section of such websites. To locate the driver, find the manufacturer and model name or number of your sound card, and then visit the
Hardware and software vendor contact information website.
Find Audio Drivers You Need
Audio drivers available for download from the Realtek website are general drivers for our audio ICs, and may not offer the customizations made by your system/motherboard manufacturer. To be sure you obtain the full features/customizations provided in your original audio product, please download the latest drivers from your system/motherboard manufacturer's website. Visit the link below
http://www.realtek.com.tw/...
Free Download Audio Drivers
http://www.free-codecs.com/Audio_Codecs.htm
Download Audio Driver for Windows 7
Realtek AC'97 Driver (Windows Vista / Windows 7)
Update your embedded sound from Realtek to the latest AC'97 codec. Version 6.0.1.6305
Download Now
Download Audio Driver for Windows XP
Realtek High Definition Audio Codec (Windows 2000/XP/2003) Update your onboard HD sound from Realtek to the latest driver release.
Download Now
Friday, 23 November 2012
Clean Install Windows 8
What's a Clean Install Windows 8
A Windows 8 clean install involves removing the existing operating system installed on a partition (a previous Windows 8 installation, Windows XP, Linux, Windows 7... it doesn't matter) and then installing Windows 8 from scratch on that same drive. A clean install is also sometimes referred to as a"custom install." In other words, a clean install of Windows 8 is the erase-whatever-is-there-and-install-a-new-copy-of-Windows-8 process and is usually the best method of installing Windows 8. I always suggest a clean install over upgrading, say from a previous version of Windows like Windows 7.
Preparation Before Clean Install Windows 8
Backup Your Data The first thing to do is to keep data like documents, music, videos, games etc Locate all the installation media and downloaded installation files that you used to install the programs so they're available to reinstall once the Windows 8 clean install is done.
Write down Your Product Key, this 25-digit alphanumeric code is required during the Windows 8 clean install process. If you've purchased Windows 8 yourself, the product key should be included with the DVD media you received or in the email confirmation you received when you purchased Windows 8 for download. If Windows 8 came preinstalled on your computer, look for a sticker with the product key somewhere on your desktop, laptop, or tablet device.
Starting Clean Install Windows 8
To start the Windows 8 clean install process, you'll need to boot your computer from whatever installation source you happen to be using: either a DVD disc or a flash drive.
In other words, if you have a Windows 8 DVD and you would like to install Windows 8 from an optical drive, then boot from the Windows 8 DVD. Alternatively, if you have the Windows 8 installation files properly copied to a USB based drive, then boot from the USB device.
Loading Files Installation of Windows 8
If you see the Windows 8 splash screen as shown below, that's Windows 8 setup process is starting
properly
Choose Language, Time, and Other Preferences
Choose the Language to install, the Time and currency format, and the Keyboard or input method that you'd prefer to use in Windows 8 When done click Next
Click the Image to Enlarge
Installing
Click "Install now" button in the middle of the screen
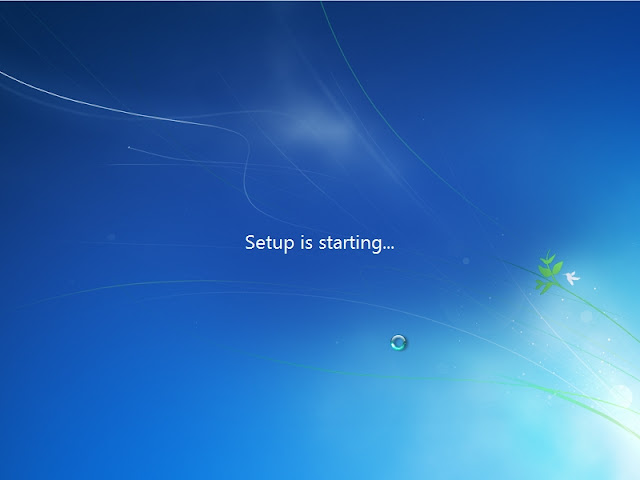
Starting Setup Windows 8
The Windows 8 setup process is now beginning. Nothing to do here but wait just a moment.
Enter Windows 8 Product Key
Enter the 25 digit code, When done click "Next"
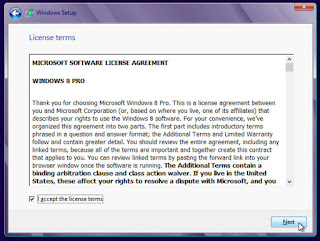
Microsoft Software License Agreement
After you read through the agreement, check box (I accept the license terms)
Then click "Next"

Installation Method
Which type of installation do you want?. You have two options: Upgrade and Custom.
Select and Click " Custom Install Windows only (advance)
Where do you want to install Windows?
Screen you'll see a list of all the partitions that Windows 8 sees on the computer. Windows 8 clean Install will
remove installed current operating system and will be replaced with Windows 8. It doesn't matter what
operating system is currently applied on your computer (Linux, Windows 7, Windows XP etc)
Select "Drive option (advanced)
Then click "Next"
Deleting the Partition
Do you know that all data on the partition will be erased forever
Select "Delete"
And Click Next
Confirmation of Deletion
Click OK
(Maybe there is other partition to delete, you can use the same method)
Where do you want to install Windows?
Select Unallocated space to install Windows 8, then click Next
The next step just wait and little to do
- Wait while Windows 8 installed
- Restart your computer, just click Restart now
- Wait for Windows 8 setup to begin again
- Wait to install Hardware
- Wait to finish installing
- Wait for restarting your PC automatically
- Wait for Windows 8 Start up
- Wait while Windows 8 basic wizard to start
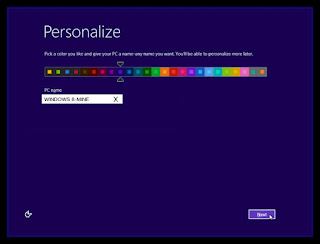
Personalize
To personalize screen color and PC name,
Pick a Color Theme & Name Your PC for your Windows 8 Start Screen, of course you can change it
later from the Start screen area of PC Setting, When complete click Next
Settings
On the Settings screen, you have two options (Use Express Setting/default setting and Customize)
If you select Customize you will go through additional screen with network sharing, Windows update,
feedback etc, I thinks it would be better if you accept Microsoft's recommended default setting (Express Setting) for Windows 8, which are detailed on screen.
To continue click "Use express setting"
Sign in to your PC
Microsoft will create an account for you based on email address entered. It's the best sign in with your Microsoft account, if you don't have, create a new one or you can enter any email address.
When you've entered an email address then click Next
Note
The advantage of using a Microsoft account is that you can easily use the Windows Store, you can sync major settings between multiple Windows 8 computers, and more.
Verity Your Account
The next screen (not shown) enter your password, phone number and password recovery
The next step just wait till Windows 8 Clean Install is complete
- Windows 8 is creating your account
- Finalizing Your Setting
- Prepare the Start Screen
Windows 8 Clean Install is Complete
This completes the final step of your clean install of Windows 8.
Congratulations !
Get to know more about Windows 8
http://www.gpp0407.info/2012/05/windows-8.html
Tuesday, 20 November 2012
Installing Windows 7
Installing Windows 7
Windows 7 probably the easiest Windows operating system to install,
When you install windows 7, you only asked a few question, most the
setup process is completely automatic.
If you wish to install Windows 7 onto a computer that already has Windows Vista, you can choose an in place upgrade if you wish. If you have Windows XP installed, you must do a Clean Installation, but you still qualify to buy a copy of Windows 7 for the upgrade price. I don't recommend in place upgrades because they bring all the problems and slowness from Windows Vista and bring them into your new Windows 7 system. Before you start make sure you have the following items: your Windows 7 installation DVD and your Windows 7 product key.
This article will help you make the right installation decision and link you to visual, step by step guides
designed to walk you through the entire Windows 7 installation process one screen at time
Stage 1 - Basic Configuration
You need to turn your computer on and insert the Windows 7 install DVD.
The computer will come up with a message saying "Press any key to boot from DVD"
Then press any key and the black Windows 7 installing screen will appear "Windows is loading files......"
Afterwards it will appear windows logo animation
When Windows 7 setup has loaded it will ask you the basic question, what language do you speak,
where do you live and what keyboard layout you will use.
Select Option and Click Next
The next screen allow you to repair Windows 7 if there is something goes wrongClick Install Now
Then you will see the words Starting Setup
Windows License Terms will appear on your screen, accept the term by checking the box
(I accept the license term) then Click Next
You can not select the upgrade option because you booted from the DVD, You should Click the Custom (Advance) Option
Where do you want to install windows?
If you see the partition you want to install Windows onto, click "Next"
To change the partitions click "Drive Option"
There are many features on Drive Option likes Creating a new partition, deleting an existing, formating etc.
When done Click "Next"
It will take about 25 minutes to install Windows 7 into hard disk. The setup completely automatic and the
computer will restart a couple of times when necessary.
Do not press any key, all thing will do automatically, Windows will alert you "Setup is preparing your computer for
first use"
Stage 2 - Basic Settings
It's now the time Windows 7 will restart into the first time setup wizard. on your computer screen will ask you to fill in Your Name and Computer name will be.In the first box type Your Username
In the second box type computer name (general name "above-PC)
When done click Next
The next screen will ask you to fill in a password. If you choose to have a password, it will force you to put
a password hint in, even if you don't use it. It will be better for computer security, you set a password.
Enter Password then click Next
Activation pairs your product key with your computer
Type your windows product key (25 character). You can find your Windows product key on a label included with the package that came with your copy of Windows. If you bought an OEM version from a computer company the label will be on the side of the computer.
Check box "Automatically activate Windows when I'm online"
Don't check if you don't want
Then click Next
Help Protect your computer and improve Windows automatically
It would be better to check "Use recommended setting"
To turn off these settings later, Search for 'Turn off recommended setting in Help and Support.
Review your time and date setting
Set the time, date and time zone that apply to you then click Next
Select your computer's current location
Choose where the computer is currently at the moment. e.g
Click Home Network, If you're installing Windows 7 that connected to home router.
Click Work Network, If you're installing Windows 7 at your workplace and be connected to internet
Click Public Network, If you're installing Windows 7 in a public location
It's best to configure this from within Windows, so click Skip if it's offered.
Windows is Finalizing Your Settings
When all setting Windows 7 finalized It will automatically log in, prepare your desktop and proceed to
the desktop.
When you've finished installing Windows 7, you will see the Windows 7 Desktop. If you wanna see the Welcome Center, then through pick the Start (the big Windows logo on the bottom left) and then Getting Started.
Now you can choose options from the center and to setup computer.
Now that you’ve got Windows 7 we recommend that you install Microsoft Security Essential,
and update Windows 7
Shopping results for Windows 7
Win 7 Home Premium w/SP1 - 1 PC $96 - 25 stores
Win 7 Professional - 1 PC $14 - 4 stores
Win 7 Professional w/SP1 - 1 PC $136 - 21 stores
References:
http://windows.microsoft.com/en-AU/windows7/Installing-and-reinstalling-Windows-7
http://www.andrewtechhelp.com/how-tos/93-windows-7-installation-guide
http://www.youtube.com/watch?v=pf408Rkc5IA
Tuesday, 13 November 2012
How to Format Hard disk Before Installing Windows 7
Many people have been having a problem when they tried to install Windows 7 on their computer, which already had another Windows installed on it (Windows XP, Vista or even Windows 7 itself). Well, I also had this problem, and so I searched for a solution and found it. That`s what I`ll show you in this post. When you cannot format the hard disk before installing Windows 7 and proceed with the installation process without actually removing the Windows that was previously installed on the disk, you would notice that Windows 7 automatically creates a folder named “Windows.old” or something similar to this, with a transparent icon.
You may think that deleting this folder would do the thing, but it`s not. Even if you delete the “Windows.old” folder, the previous Windows would still be present (though it would naturally not work as all its files have been deleted). So, deleting the “Windows.old” folder is not the proper way to remove the previous Windows from the disk. You should also know that formatting the disk would remove all the content from the disk, not only the Windows files. So, keep this in mind, and be sure to keep backups of your personal files.
Programs do not need to be backed up as you can install them again, however, if you have files you use with applications you will want to keep these as backup, as well as some plug-ins or add-ons that do not come with the program setup files (if you have them). Now, you may have your reasons to want to format the hard disk. I had to format my hard disk as it was infected with viruses that damaged the previous Windows.
Also, people like to delete everything (they have backups of personal files) when they install a new Windows. For example, if you are upgrading from Window XP to Windows 7. Well, let`s come to how to format the disk. Inserting the Windows 7 disk after loading the previous Windows will eventually not allow you to format the disk, unless you are ask to restart the system. Then again, when I inserted the disk and restarted the computer, I could not find the option to boot with the Windows 7 DVD. And that`s the problem that many people face.
To format the hard disk before installing the Windows 7 with the DVD in this case, you need to go the BIOS. To access BIOS, you need to turn off your computer, and turn it on again.
Normally, to enter BIOS, you need to press a F (function key) key or the DEL key, depending on the computer or laptop you use. For some it`s F2, some F11, other computers have other keys.
The key that you need to press appears on the very first screen as you turn on your computer. It`s really quick, so be sure to see which key it is and press it before the first screen display disappears. What you need to do in BIOS is change the boot order accordingly. You need to make the DVD first (at the top). If you have never entered BIOS, you may be a bit anxious, and you are right because doing something wrong there can have severe consequences on the system. But you need not fear and just follow the instructions. You will be using the arrow keys. The instructions are clearly labeled on the BIOS screen.
Go to the Boot order option. You should see items like DVD rom, hard disk, CD rom, USB, network, … there. To move the DVD rom option up and down, you normally use the + and – keys. This should be easy. Then, be sure to SAVE the settings and exit the BIOS screen by following the instructions there.
Then, the Windows 7 DVD should boot first (instead of the installed Windows) and during the installation process with the DVD, you will have an option where you can choose to format the disk and partition it if you wish. By the way, be sure to have backup of your important files before formatting everything. Well, that`s how you do this. To sum up, you insert the DVD, restart, enter BIOS, make DVD the first item in Boot Order, exit BIOS and proceed with the installation from the DVD during which you will be presented with the option. Normally, not all BIOS are similar, but you should not have much problem as it`s not much different too. I hope this post helped you and that you could format your hard disk without any problem. If you want to add something or ask for help, you are welcome to do so through our comment.
(Source: http://pc-internet-zone.blogspot.com/2011/06/format-hard-disk-before-installing.html)
Subscribe to:
Comments (Atom)


+option..jpg)


